How to Use the Trinity Audio CMS
Overview
The Trinity Audio CMS gives you full control over your audio content. The workflow has three main steps:
- Create a Channel - your podcast's identity and home
- Add Audio Files - the individual episodes or clips
- Build a Playlist - a curated, distributable feed of your content
Once your playlist is ready, you can export an RSS feed and submit it to podcast platforms.
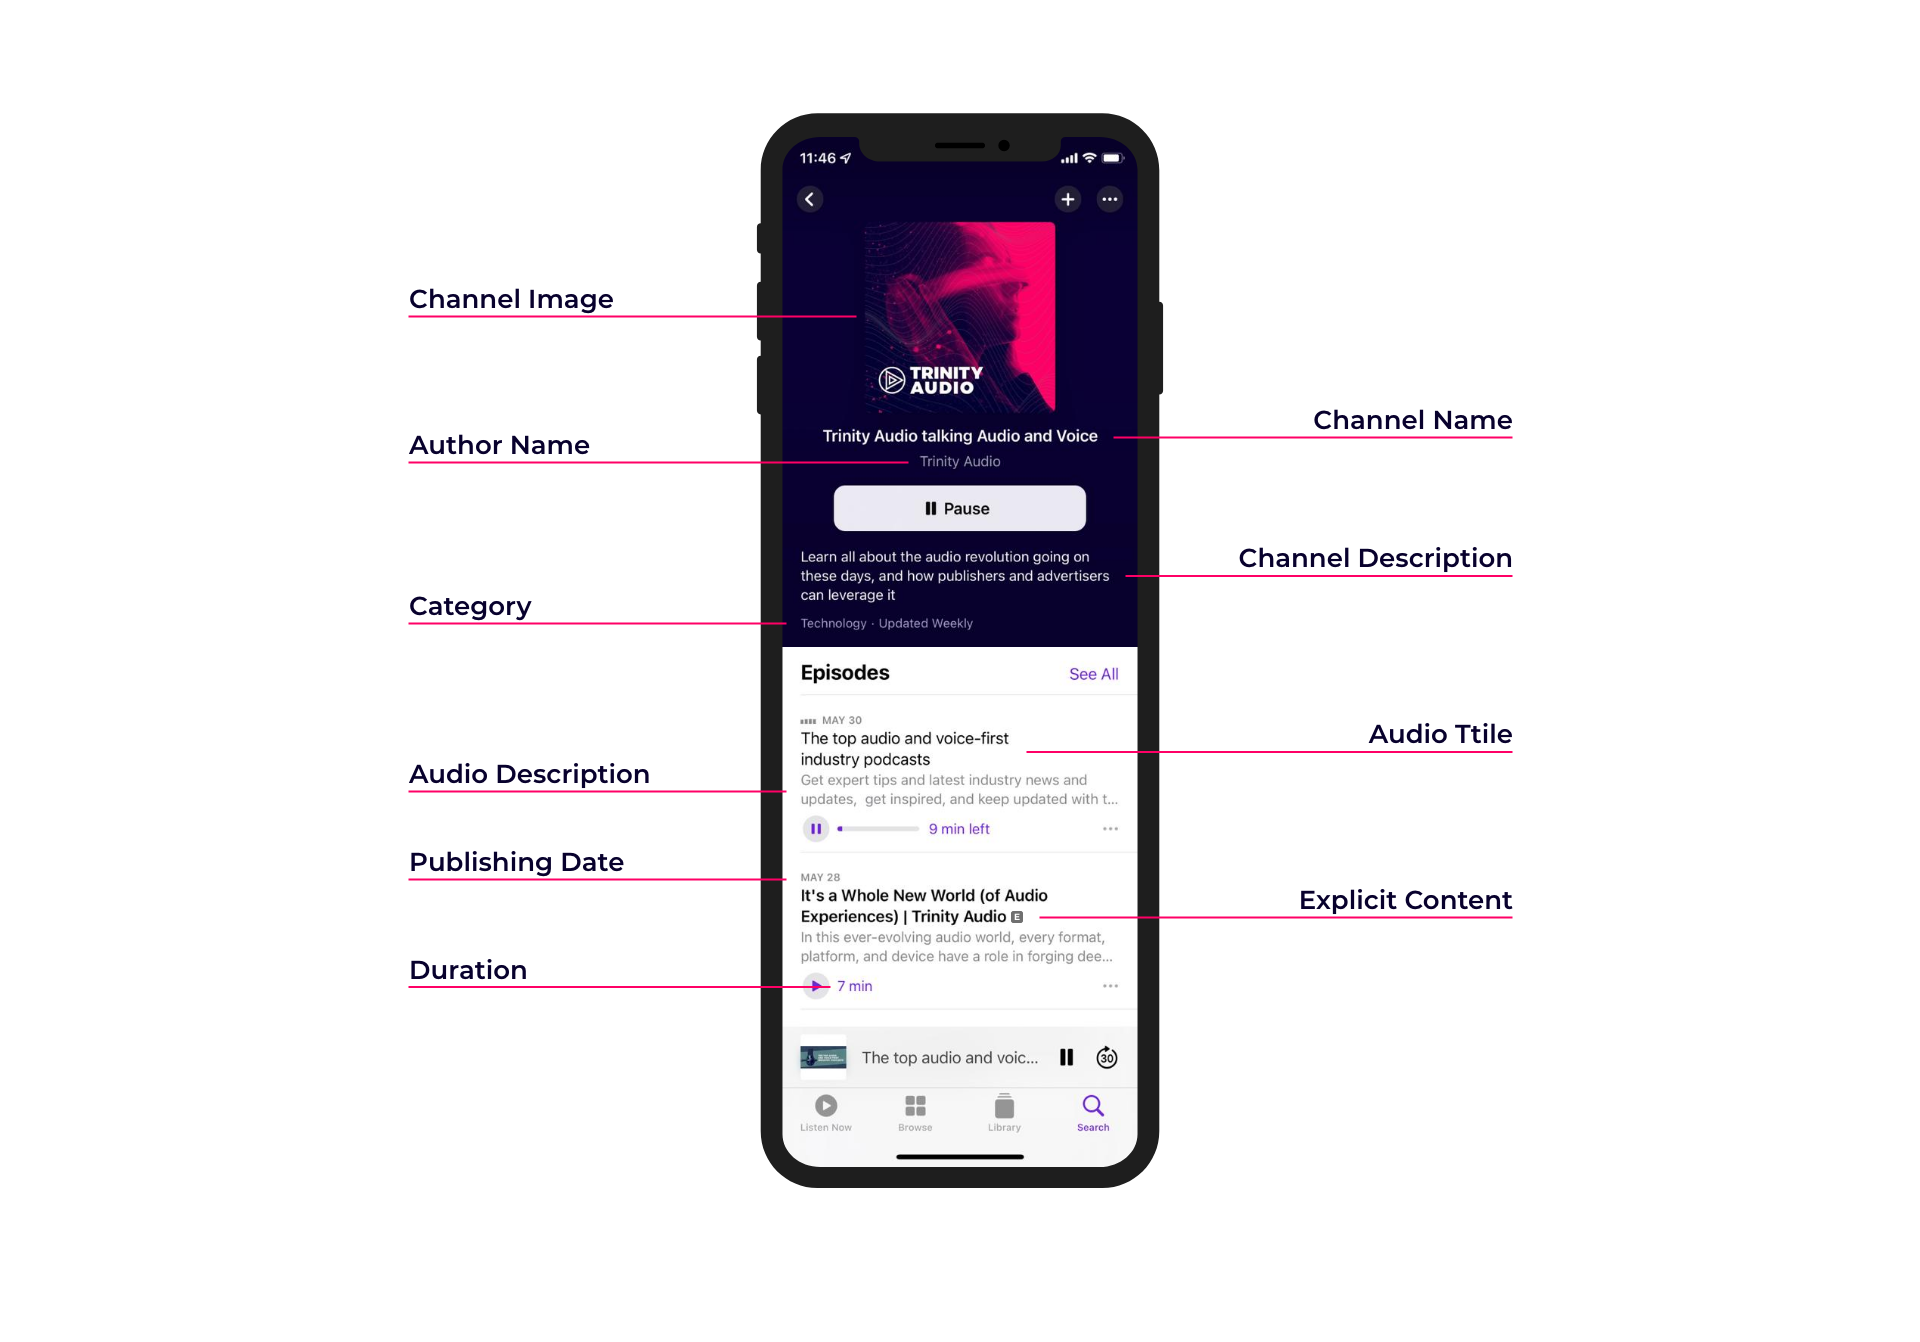
Step 1: Create a Channel
A Channel is the top-level container for your audio content. It maps to what listeners see as your podcast or show on external platforms.
Navigate to the CMS tab and click Create Channel.
Fill in the following fields:
- Name - The public name of your podcast as it will appear on streaming platforms. Keep it clear and recognizable.
- Description - A short paragraph describing your show to potential listeners. Keep it concise and SEO-optimized. This description is used by podcast platforms in search and discovery.
- Category - Select the category (or categories) that best reflect your content. These map to Apple Podcasts categories and help listeners find your show.
- Author Name - The creator or publisher of the podcast.
- Author Email - The publisher's email address. This is used for ownership verification and platform queries.
- Image - Your podcast cover art. It should include a title, brand, or source name. Minimum size is 1400x1400 px, maximum is 3000x3000 px. Square format required.
- Explicit - Check this box if the content is not suitable for audiences under 13.
- Use Background Music - Optionally enable background music generation for audio produced in this channel.
Tip: You can configure default publishing preferences per channel, including a default language, voice, scheduled publish time, and timezone. This saves time when adding multiple audio files to the same channel.
Step 2: Add Audio Files
Audio files are the individual pieces of content (episodes, clips, articles) that belong to a channel.
From the CMS, go to Audio and click Create Audio.
Fill in the following fields:
- Channel - Connect this audio file to one of your channels.
- Title - The public title of the episode or content. This is visible on all platforms. Maximum 255 characters.
- Description - A short public description of this piece of content. Keep it SEO-friendly.
- Language - The spoken language of the audio content.
- Tags - Add tags to organize your content and make it easier to filter into playlists. You can create and reuse tags across your library.
- Content - Choose one of two options:
- Upload a file - Upload an audio file directly (MP3 recommended).
- Link - Paste a direct URL to an MP3 file hosted elsewhere.
- Scheduled Publishing - Optionally set a date, time, and timezone for when this content should become publicly available.
Tip: Tags are powerful. A well-tagged library makes it easy to build targeted playlists by topic, series, or date without manual curation.
Step 3: Create a Playlist
A Playlist is a filtered, ordered collection of audio files from a channel. It generates an RSS feed that you can submit to podcast platforms or embed as a player.
Go to Playlists and click Create Playlist.
Fill in the following fields:
- Name - An internal name for the playlist. This is for your reference only and is not public.
- Channel - Connect the playlist to a channel. Only audio from this channel will be included.
- Language - Only audio files matching this language will appear in the playlist.
- Tags - Filter the playlist to include only audio files that share the selected tags.
- Order By - Choose the order in which episodes appear: oldest to newest, newest to oldest, alphabetical, or most played.
- Audio Limit - Set how many audio files the playlist can contain (5, 10, 20, 50, or 100 items).
- Content URL - The website associated with the content - typically your homepage or the show's landing page.
Once saved, your playlist will process and become ready for distribution.
Step 4: Export and Distribute Your Podcast
When your playlist status shows Ready, you can share it with the world.
Export Your RSS Feed
- Go to the Playlists screen and open your playlist.
- Click the Export button.
- Copy the RSS Feed URL.
What is an RSS feed? RSS (Really Simple Syndication) is the standard format used by podcast platforms to ingest and sync your show. Your RSS URL is the single source of truth - submit it once per platform and updates sync automatically.
Submit to Spotify
Before you start: You need a Spotify account. Sign up at spotify.com if you don't have one.
Phase 1 - Submit your RSS feed:
- Go to podcasters.spotify.com and log in.
- Click Get Started and paste your RSS feed URL.
- Fill in your show details: category, language, and country.
- Verify ownership using the code sent to your author email.
- Review the details and click Submit.
Spotify typically approves new shows within 24-48 hours (up to 10 business days for new accounts).
Phase 2 - Add your Spotify URL to Trinity Audio:
- Once your podcast is live, go to open.spotify.com and search for your show.
- Open your podcast page and copy the URL from your browser (format: https://open.spotify.com/show/...).
- Go back to your Trinity Audio playlist's Podcast Settings page.
- Paste the URL into the Spotify field and save.
Submit to Apple Podcasts
Before you start: You need an Apple ID. Sign in or create one at podcastsconnect.apple.com.
Phase 1 - Submit your RSS feed:
- Log in to Apple Podcasts Connect.
- Click the + button next to "Podcasts" and select New Show.
- Choose Add a show with an RSS feed and paste your RSS URL.
- Apple will validate your feed - review the artwork, title, author name, description, language, and category.
- If everything looks correct, click Publish to submit for review.
If there are validation warnings or errors, fix them in Trinity Audio (re-check your channel's image size, author email, and description) and resubmit. Review typically takes 24 hours to 2 weeks.
Phase 2 - Add your Apple Podcasts URL to Trinity Audio:
- Once approved, find your show in the Apple Podcasts app or on podcasts.apple.com.
- Copy the podcast URL (format: https://podcasts.apple.com/podcast/id...).
- Go back to your Trinity Audio playlist's Podcast Settings page.
- Paste the URL into the Apple Podcasts field and save.
Updating Content
Changes to audio files, channels, or playlists may take a few hours to reflect on external platforms due to platform-side caching. This is expected behavior and not a Trinity Audio issue.
If you have any questions, please reach out to our support team.


