
Introduction
Thank you for your interest in the Trinity Audio Webflow Plugin.
This guide walks you through installing, configuring, and using the plugin on your Webflow site.
Before you begin, please ensure your site meets the plugin requirements. If you have any questions, contact us at support@trinityaudio.ai - we’ll be happy to help.
Requirements
The Trinity Audio player works only for sites that have a Blog Collection in Webflow.
To check this:
- Open your site in Designer.
- Click the CMS icon.
- Make sure you have Blog Posts in your collections.
Once confirmed, you can proceed with the installation.


Installation Steps
Step 1 – Open “Apps & Integrations”
- In the left menu, click “Apps & Integrations”.
- Or go directly to: https://webflow.com/dashboard/apps

Step 2 – Find the App
- Use the search bar and type Trinity Audio.
- Click on the app in the search results.
Step 3 – Install the App
- Click Install App.
- You’ll be redirected to the app’s authorization screen.
- Select the site(s) you want to connect.
- Click “Authorize Application” to allow the app to access your Webflow site data.


After installation, you’ll be redirected to your dashboard with a list of connected sites.

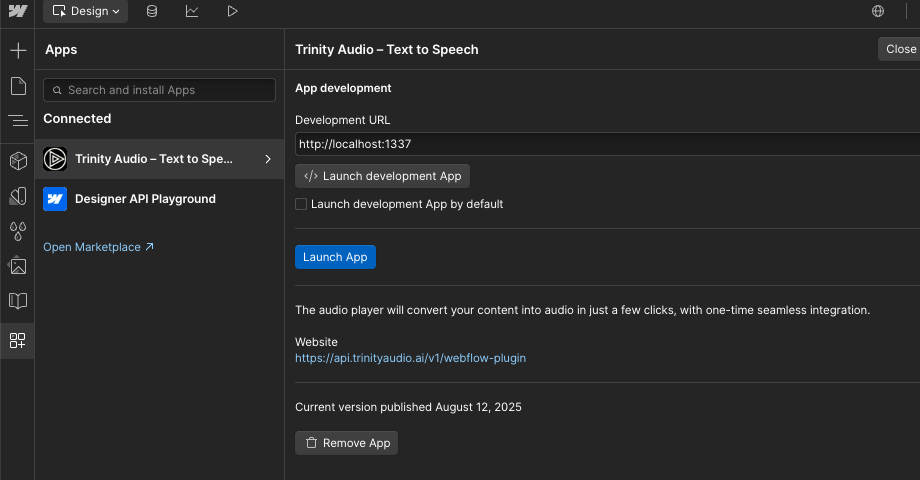
Step 4 – Launch the App in Designer
- In dashboard click on website where you want enable Trinity Audio App
- In the Designer top bar, click the Apps icon (puzzle piece symbol).
- Find Trinity Audio in the list and click “Launch App”.
- The app panel will appear inside Designer.
Step 5 – Registration
- Accept Terms of Services
- (Optional) Newsletter opt-in: check “Subscribe to Trinity Audio updates” to get product tips and release notes. This won’t affect your ability to use the app, and you can unsubscribe anytime.
- Click “Register”
What is the Account Key?
Your Account Key is a unique identifier that links your Webflow site to your Trinity Audio account. Keep it private. You may be asked for it when contacting support or performing advanced configurations (e.g., migrating sites or enabling enterprise features). You can view it anytime in the app panel.

Registration is completed.

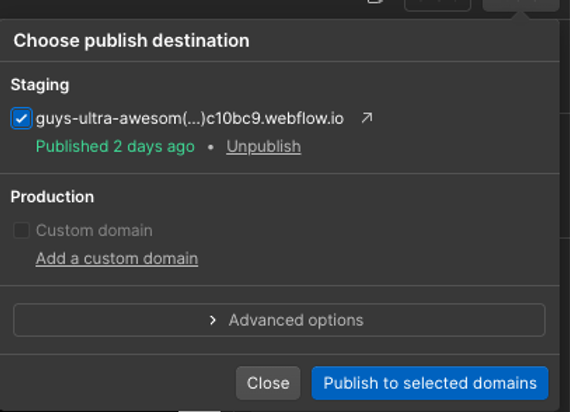
Step 6 – Publish Your Site
- Once you’re happy with the design, click “Publish” in the top right corner.
- Select your domain(s) and confirm.
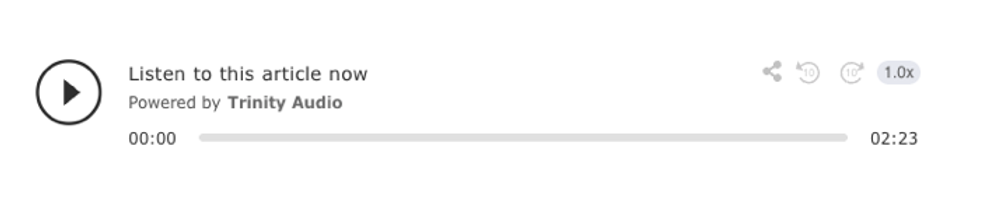
\Step 7 – View the Trinity Player
- Navigate to your website’s blog, open any blog post page, and you will see the Trinity Audio player embedded.
Configuring the plugin
Once installed, you will have access to the Trinity Audio General Configuration panel.Here you can:
- Select your preferred voice and language.
- Click “Save Settings” to apply changes.
Please note: Changes may take up to 5 minutes to appear on your site.

Summing things up
In case you have any further questions, please don’t hesitate to reach out to us directly via support@trinityaudio.ai, we’d be happy to assist you.
Happy listening from all of us at Trinity Audio!


