.png)
Introduction
Thank you for taking an interest in the Trinity Audio WordPress plugin. In this manual, we’ll walk you through some advanced settings supported by the plugin. If any questions arise, don’t hesitate to reach out to our team at support@trinityaudio.ai and we’ll make sure to help out.
Topics
In this guide, we're going to cover the following topics:
- LiteSpeed cache plugin
- 3rd party themes
- TTS Player JS Code
LiteSpeed cache plugin
3rd party themes
TTS Player JS Code
LiteSpeed cache plugin: compatibility
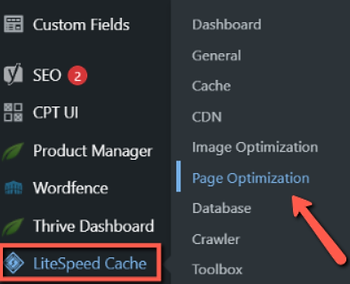
First, in your WordPress admin dashboard, hover over the LiteSpeed Cache plugin in the left sidebar, and select "Page Optimization" from the submenu that opens:
In the new dashboard, click on the "Tuning" tab:
![A screenshot of the LiteSpeed Cache settings header. A red box and arrow highlight the "[8] Tuning" tab.](https://cdn.prod.website-files.com/693c835642be3eab56f024c4/69a07f5abfd7fcdf2647b8ff_a70e3d_16582cb264d644f29d92bd49bc8a246e~mv2.png)
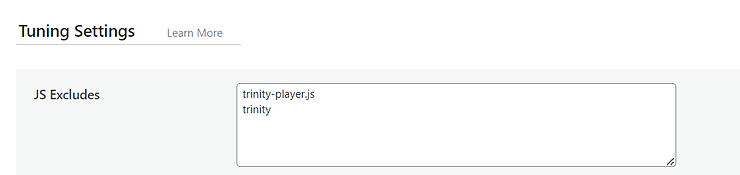
Add the following exclusions to the JS Excludes field:
- trinity-player.js
- trinity
trinity-player.js
trinity
After you paste them into the corresponding field, don't forget to save your changes:
![A screenshot of the LiteSpeed Cache settings header. A red box and arrow highlight the "[8] Tuning" tab.](https://cdn.prod.website-files.com/693c835642be3eab56f024c4/69a07facd2367c859b16b5da_a70e3d_ab880658eb32474f958b3ddcbca092bd~mv2.png)
3rd party themes
This section is written for clients using 3rd party themes on Wordpress which are causing the TTS player not to load.
Pleaser read the following notes before making any changes based on the instructions of this section:
- Don't use this settings unless you are sure. If there is any doubt, always consult with oursupport.
- If it doesn't help with your theme,sign up to our dashboardtoget a JS snippetthat supports all themes, pages and more.
Don't use this settings unless you are sure. If there is any doubt, always consult with our support.
If it doesn't help with your theme, sign up to our dashboard to get a JS snippet that supports all themes, pages and more.
If order to activate the TTS player with your 3rd party theme, follow these steps:
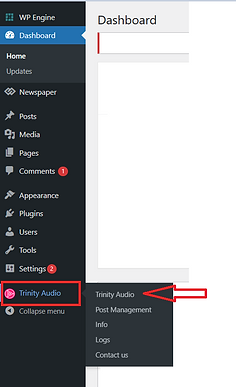
- Start by going to your WordPress admin dashboard. Look on the left side and find the Trinity Audio plugin. Click on it, and then choose "Trinity Audio" from the options that appear.
- Scroll down the page until you reach the bottom. You'll see a section called "Advanced settings.
- In this section, you'll find a checkbox. Please make sure to check the box, just like the example shows.
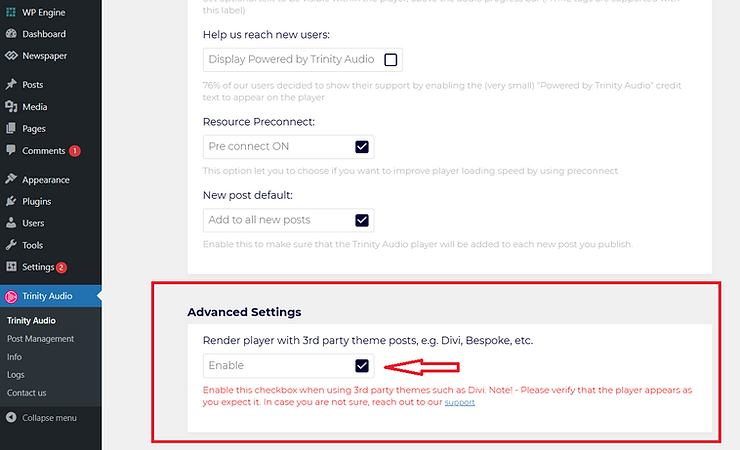
Scroll down the page until you reach the bottom. You'll see a section called "Advanced settings.
In this section, you'll find a checkbox. Please make sure to check the box, just like the example shows.
- Once you've checked the box, remember to save the changes you've made:

Adding TTS Player JS Code to your WordPress Site
- Create a player in theTrinity Audio dashboard. For more information, please visit theplayer implementation guide.
- Copy the player code from the Trinity Audio dashboard.
Create a player in the Trinity Audio dashboard. For more information, please visit the player implementation guide.
Copy the player code from the Trinity Audio dashboard.
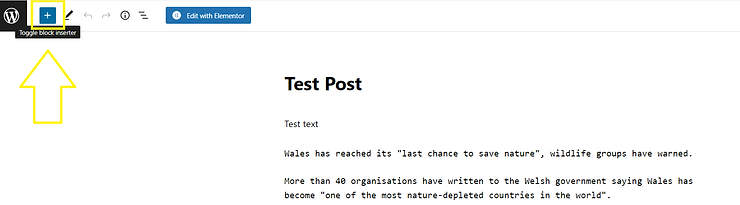
Now, let's get visual! Check out these screenshots in your WordPess admin panel:
- Step 1:Hit that "Insert" button up in the top left corner of your post:
- Step 2: Search for 'html' in the search bar:
.png)
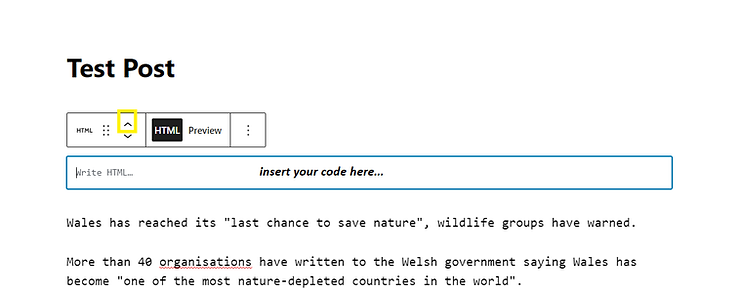
- Step 3: moving HTML panel by the arrow button to the right place before your first paragraph and adding the code snippet:
Remember to save your changes. Once you've added the Player Code to your post, let us know so our team can ensure the implementation is correct and the text is read accurately. After this final step, we'll activate the Player for you.
Note: For successful JS integration, disable the Trinity Audio WP plugin on posts where you've inserted the Code snippet.
Summing things up
In case you have any further questions, please visit our FAQ page in WordPress and on our website. In addition, please don’t hesitate to reach out to us directly via support@trinityaudio.ai, we would be happy to hear from you (pun intended).
Happy listening from all of us at Trinity Audio!